eosio.token transfer正确的使用方式

前言

  • 额,正确使用的方式不就是转账吗?直接调用不就可以了?
  • 是的,就是转账,但是
    1. 我要在账号中的合约中执行转账(这个之前的文章已经实现了,不是本篇文章的重点)
    2. 同时执行一个greet(std::string msg) action呢?
    3. 当其他任何玩家转账给我,我要知道转账的数据,同时给我捎句话呢
  • 那就使用一个action转账,一个action greet(msg)!!!
  • 目的是到了呢,但是这个是两个action呢?那就是有时间差的,貌似不符合我的需求哦,那该怎么办呢?
  • 好的,如果你看过之前的文章,其实你已经明白怎么做了,自定义dispatcher这个宏
  • 是的,完全正确,那么本篇文章就是接着之前的文章而来,把数据记录起来

游戏设计

  • 本次的合约来玩一个游戏叫做:paymsg
  • 游戏规则:
    • 任何人均可以参加游戏,每次参加至少游戏需花费1eos
    • 花费了这个费用的玩家 合约会自动将他转账的memo储存在区块链中,但是会加上我的签名
    • 当然,当你花费超过5个eos时,将会有一次免费的机会再次更新你储存的信息

      合约设计

  • 合约的具体设计请看源码就可以了
    1. 拦截transfer方法,获取转账信息
    2. 记住反序列化的时候,需要建一个struct来承载数据的信息
    3. 设计一个对外的action用于 用户免费更新储存的信息
    4. 此合约只是demo,仅供参考
1
2
3
4
5
6
7
8
9
10
11
12
13
14
15
16
17
18
19
20
21
22
23
24
25
26
27
28
29
30
31
32
33
34
35
36
37
38
39
40
41
42
43
44
45
46
47
48
49
50
51
52
[[eosio::action]]
void upmsg(name player, std::string msg) {
require_auth(player);
// 这个地方可以使用这种方式初始化table 真不知道是哪里醉了
paymessage_index paymessages(get_self(), _code.value);
auto iterator = paymessages.find(player.value);
eosio_assert(iterator != paymessages.end(), "you are not in shaokun paymsg game");
eosio_assert(iterator->uamount >= 50000, "you must send more than 5 eos that can update your msg");
paymessages.modify(iterator, player, [&]( auto& row ) {
row.player = player;
row.msg = msg;
row.uamount = 0; //置为0 ,下次更改必须花5eos以上
});
}

void transfer(){
// 反序列化得到st_transfer结构体对象
// 就可以拿到transfer的交易信息了,而且是eosio.token发过的transfer
auto transfer_data = unpack_action_data<st_transfer>();
// eos是4位小数,由于不支持实际意义上的小数,所以这里要使用整形10000代替1eos
eosio_assert(transfer_data.quantity.amount >= 10000, "must more than 1 eos provide");
auto tr_from = transfer_data.from;
if(tr_from == get_self()) {
//自己转出去就不需要参加游戏了
return;
}
auto tr_amount = transfer_data.quantity.amount;
// https://github.com/EOSIO/eosio.cdt/blob/master/libraries/eosiolib/symbol.hpp
if(transfer_data.quantity.symbol != eosio::symbol("EOS",4)){
// 我们只收eos
return;
}
auto tr_memo = transfer_data.memo;
// 这里一定要按照这样的格式初始化table,不然无法写入数据
// 理论上这种方式初始化的table权限是一样的呢 paymessage_index paymessages(get_self(), _code.value);
paymessage_index paymessages(get_self(), get_self().value);
auto itr = paymessages.find(transfer_data.from.value);
if (itr == paymessages.end()){
paymessages.emplace(get_self(), [&]( auto& row ) {
row.player = tr_from;
row.uamount = tr_amount;
row.tamount = tr_amount;
row.msg = "welcome to shaokun paygame, your pay msg is :" + tr_memo;
});
}else {
paymessages.modify(itr, get_self(), [&]( auto& row ) {
row.tamount += tr_amount;
row.uamount += tr_amount ;
row.msg = "welcome come back to shaokun paygame:"+ tr_memo;
});
}
}

编译,部署,验证

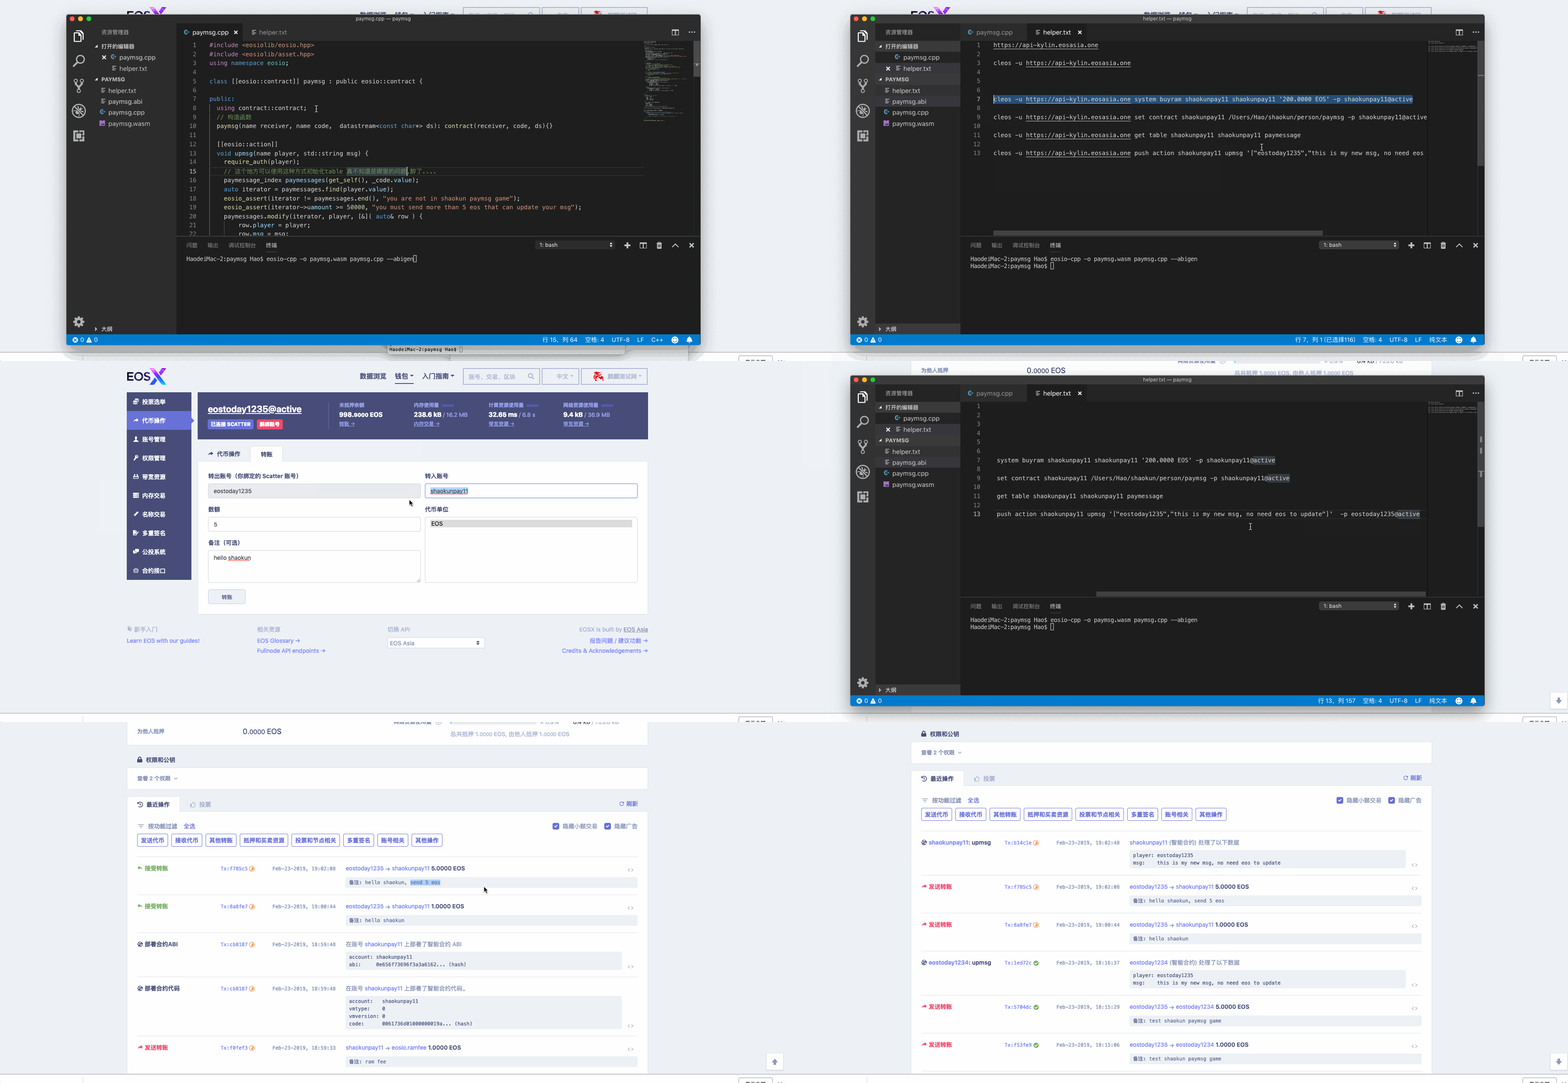
  • 编译,买RAM,部署
  • 使用shaokunpay11部署合约
  • 使用eostoday1235进行添加数据
  • 使用eostoday1235进行两次的upmsg进行修改数据

    shaokun

  • 源码

填坑

  • 之前有一个困惑的问题是关于scatter和eosjs2无法一起使用,官方也没有例子,而现在找到了github
  • 以下我只是搬运工 ^.^
  • scatter + eosjs2
  • npm i -S scatterjs-core scatterjs-plugin-eosjs2 eosjs@20.0.0-beta3
1
2
3
4
5
6
7
8
9
10
11
12
13
14
15
16
17
18
19
20
21
22
23
24
25
26
27
28
29
30
31
32
33
34
35
36
37
38
39
40
41
42
43
44
45
46
47
48
49
import ScatterJS from 'scatterjs-core';
import ScatterEOS from 'scatterjs-plugin-eosjs2';
import {JsonRpc, Api} from 'eosjs';

ScatterJS.plugins( new ScatterEOS() );

const network = ScatterJS.Network.fromJson({
blockchain:'eos',
chainId:'aca376f206b8fc25a6ed44dbdc66547c36c6c33e3a119ffbeaef943642f0e906',
host:'nodes.get-scatter.com',
port:443,
protocol:'https'
});
const rpc = new JsonRpc(network.fullhost());

ScatterJS.connect('hello shaokun', {network}).then(connected => {
if(!connected) return console.error('no scatter');

const eos = ScatterJS.eos(network, Api, {rpc, beta3:true});

ScatterJS.login().then(id => {
if(!id) return console.error('no identity');
const account = ScatterJS.account('eos');

eos.transact({
actions: [{
account: 'eosio.token',
name: 'transfer',
authorization: [{
actor: account.name,
permission: account.authority,
}],
data: {
from: account.name,
to: 'safetransfer',
quantity: '0.0001 EOS',
memo: account.name,
},
}]
}, {
blocksBehind: 3,
expireSeconds: 30,
}).then(res => {
console.log('sent: ', res);
}).catch(err => {
console.error('error: ', err);
});
});
});
  • scatter + eosjs1
  • npm i -S scatterjs-core scatterjs-plugin-eosjs eosjs@16.0.9
1
2
3
4
5
6
7
8
9
10
11
12
13
14
15
16
17
18
19
20
21
22
23
24
25
26
27
28
29
30
import ScatterJS from 'scatterjs-core';
import ScatterEOS from 'scatterjs-plugin-eosjs';
import Eos from 'eosjs';

ScatterJS.plugins( new ScatterEOS() );

const network = ScatterJS.Network.fromJson({
blockchain:'eos',
chainId:'aca376f206b8fc25a6ed44dbdc66547c36c6c33e3a119ffbeaef943642f0e906',
host:'nodes.get-scatter.com',
port:443,
protocol:'https'
});

ScatterJS.connect('YourAppName', {network}).then(connected => {
if(!connected) return console.error('no scatter');

const eos = ScatterJS.eos(network, Eos);

ScatterJS.login().then(id => {
if(!id) return console.error('no identity');
const account = ScatterJS.account('eos');
const options = {authorization:[`${account.name}@${account.authority}`]};
eos.transfer(account.name, 'safetransfer', '0.0001 EOS', account.name, options).then(res => {
console.log('sent: ', res);
}).catch(err => {
console.error('error: ', err);
});
});
});
  • scatter + web3
  • npm i -S scatterjs-core scatterjs-plugin-web3 web3
1
2
3
4
5
6
7
8
9
10
11
12
13
14
15
16
17
18
19
20
21
22
23
24
25
26
27
28
29
30
31
32
33
34
35
import ScatterJS from 'scatterjs-core';
import ScatterETH from 'scatterjs-plugin-web3';
import Web3 from 'web3';

ScatterJS.plugins( new ScatterETH() );

const network = ScatterJS.Network.fromJson({
blockchain:'eth',
chainId:'1',
host:'YOUR ETHEREUM NODE',
port:443,
protocol:'https'
});

ScatterJS.connect('YourAppName', {network}).then(connected => {
if(!connected) return console.error('no scatter');

const web3 = ScatterJS.web3(network, Web3);

ScatterJS.login().then(id => {
if(!id) return console.error('no identity');
// https://github.com/GetScatter/scatter-js/blob/master/packages/core/src/models/Blockchains.js
// 这里官方应该写错了,携程trx了,我们把它改过来
const account = ScatterJS.account('eth');
web3.eth.sendTransaction({
from: account.address,
to: '0x...',
value: '1000000000000000'
}).then(res => {
console.log('sent: ', res);
}).catch(err => {
console.error('error: ', err);
});
});
});
  • scatter + tronweb
  • npm i -S scatterjs-core scatterjs-plugin-tron tronweb
1
2
3
4
5
6
7
8
9
10
11
12
13
14
15
16
17
18
19
20
21
22
23
24
25
26
27
28
29
30
31
32
33
import ScatterJS from 'scatterjs-core';
import ScatterTron from 'scatterjs-plugin-tron';
import TronWeb from 'tronweb';

ScatterJS.plugins( new ScatterTron() );

const network = ScatterJS.Network.fromJson({
blockchain:'tron',
chainId:'1',
host:'api.trongrid.io',
port:443,
protocol:'https'
});

const httpProvider = new TronWeb.providers.HttpProvider(network.fullhost());
let tron = new TronWeb(httpProvider, httpProvider, network.fullhost());
tron.setDefaultBlock('latest');

ScatterJS.connect('YourAppName', {network}).then(connected => {
if(!connected) return console.error('no scatter');

tron = ScatterJS.trx(network, tron);

ScatterJS.login().then(id => {
if(!id) return console.error('no identity');
const account = ScatterJS.account('trx');
tron.trx.sendTransaction('TX...', 100).then(res => {
console.log('sent: ', res);
}).catch(err => {
console.error('error: ', err);
});
});
});

总结

  • 这样就实现了以太坊payable关键字的功能了
  • paymsg这个小game的逻辑,其实也和市面上大多数的菠菜类游戏的实现方式类似,只是其中的规则少了点
  • 至此,基于eos开发dapp的所有流程基本上是讲完了
  • 当然其中有很多点我也没有讲到,主要是我在学习的过程中,其他点没有遇到太大的问题.比如说multi_index的操作
  • 关于感想,就是要有耐心去学习这个,因为目前也没有其他的更好的资料,我比较推荐官方的教程eos smart contract
  • 还有一点,如果你使用eosiocpp编译wasm,abi文件,写合约的时候,有时候需要参考源码eosio,如果使用eosio.cdt编译的合约,eosio.cdt eoslib要去这里找(ps:这个地方受过很多伤…)
  • 最后,祝大家学的开心

关于我

区块链技术痴迷的程序猿一枚,如果你喜欢我的文章,可以加上微信共同学习,共同进步。